Introducing the Xpeed Quantum X3 All-In-One Trainer, the ultimate fusion of versatility and performance for serious athletes, home gym enthusiasts, and personal trainers alike.
Xpeed Quantum X6 All-In-One Trainer
Designed to elevate your workouts with endless training possibilities, the Xpeed Quantum X6 All-In-One Trainer is the ultimate solution for those looking to maximise strength, functionality and efficiency.
Xpeed Quantum X9 All-In-One Trainer
Designed to elevate your workouts with endless training possibilities, the Xpeed Quantum X9 All-In-One Trainer is the ultimate solution for anyone looking to take their fitness to the next level.
Ensuring your flooring is even is critical for a gym layout. Each rubber tile must be consistently the same thickness, finish, and properly sealed for hygiene. Our tiles are 1m x 1m tiles with a 15mm thickness.
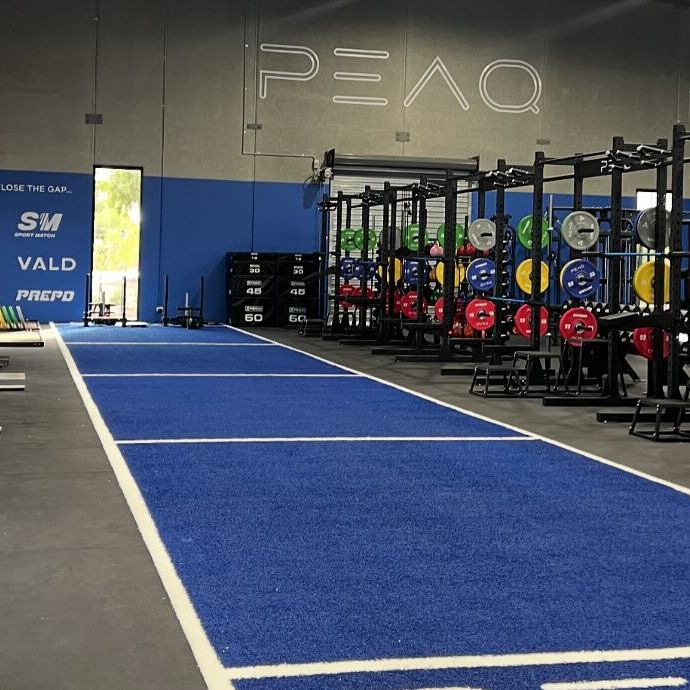
How Robust Is the Xpeed Astro Turf
- Each roll is 2 x 10m premium 15mm thickness
- Custom weave - Thicker than industry standard
- Ideal for all types of functional training in facilities with high traffic
- 1 year warranty against normal wear and tear
- The custom weave means it has the strength to handle the daily use of sleds, slam balls, battling ropes and more.- Each roll is 2 x 10m premium 15mm thickness
- Custom weave - Thicker than industry standard
- Ideal for all types of functional training in facilities with high traffic
- 1 year warranty against normal wear and tear
- The custom weave means it has the strength to handle the daily use of sleds, slam balls, battling ropes and more.
ARE RUBBER GYM TILES EASY TO INSTALL?
We recommend the following process for gym tile installation. One thing to note is that each tile is around 15kg, so if you have a lot to install, it's something to take into account as it can be tiring.
1. Prepare the Subfloor:
a. Ensure that the subfloor is clean, dry, and free from any debris or dust. Sweep or vacuum the area thoroughly.
2. Layout and Planning:
a. Plan the layout of your gym flooring by measuring and marking the centre of the room using a measuring tape.
b. Dry-fit the rubber floor tiles in the desired pattern to ensure a proper fit and appearance. We recommend a ‘brick pattern’ as this prevents shifting.
3. Trim Tiles (if necessary):
a. If you need to trim tiles to fit along the edges or corners, use a straight edge or ruler to mark the cutting lines on the back of the tiles.
b. Cut along the marked lines using a utility knife.
(IF USING GLUE)
4. Mix the Rubber Glue:
a. Read and follow the manufacturer's instructions for mixing the Rubber Glue Polyurethane Binder.
b. Pour the appropriate amount of binder into a clean bucket.
c. Mix the binder thoroughly using a mixing paddle or stick.
5. Apply the Rubber Glue:
a. Starting from the front of the room, use a notched trowel to spread an even layer of the mixed Rubber Glue on the subfloor. The spread rate should be roughly 5m2/Litre.
b. Work in small sections to ensure the glue doesn't dry before placing the tiles.
c. Use the notched side of the trowel to create ridges in the glue, which helps with adhesion.
6. Install the Rubber Tiles:
a. Press each rubber floor tile firmly into the glued area, following your planned layout. Starting from an edge at the front of your desired tiled section allows you to finish at the back of the room with the offcut sections.
b. Align the tiles for a symmetrical look.
c. Continue this process, working your way from the front section.
7. Press and Roll:
a. After placing each tile, use a clean, damp cloth to press and roll over the surface of the tile to ensure proper adhesion and remove any air bubbles.
8. Trim Excess Glue:
a. Wipe away any excess glue that may have squeezed out from the edges between the tiles.
b. Allow the glue to set for the recommended time before allowing foot traffic.
9. Allow Cure Time:
a. Allow the installed gym flooring to cure according to the manufacturer's guidelines before putting heavy equipment or engaging in intense activities.
10. Clean Up:
a. Clean tools and equipment immediately with water before the glue dries.
Following these steps should help you achieve a secure and professional installation of the rubber gym flooring.
CAN RUBBER TILES BE USED OUTDOORS?
We do not recommend using rubber tiles outdoors. Exposure to moisture can lead to issues such as mould and mildew beneath the tiles. Additionally, prolonged exposure to sun and heat could cause the tiles to fade, degrade, and lose their integrity. For these reasons, rubber tiles are best suited for stable indoor environments where they can provide optimal performance and durability.
HOW DO I MEASURE THE AMOUNT OF RUBBER FLOORING TILES NEEDED FOR MY GYM?
To calculate the amount of flooring needed, measure the length and width of your gym space. Multiply these measurements to get the total square footage. Xpeed Rubber Tiles are 1m x 1m, so this will give you the exact amount of tiles you require, we always recommend purchasing 1 or 2 extra for trimming requirements if needed.
HOW DO I CLEAN AND MAINTAIN RUBBER GYM FLOORING TILES?
Rubber flooring is low-maintenance. Regular sweeping or vacuuming will remove dirt and debris. For deeper cleaning, use a mild detergent and water solution. Avoid harsh chemicals, as they can damage the rubber.
Explore Other Mats
Enhance your workout area with these versatile mats and rubber tiles
Take It To The Mat
Experience the comfort and durability of our mats and rubber tiles.